
Drywall Installation
Contact Us

Drywall installation panels have to be done by more than one person. The major reason is that they are heavy and can also be awkward to work in particular spaces. The weight is different for different sizes. You can easily carry the eight-foot panels in the pick-up truck, but bigger sizes have to be carried by something bigger.
The materials and tools below are the basic requirements needed for your installation. The devices include the spiral saw, utility knife, tape measure, and sawhorse. Materials, on the other hand, include the joint compound, drywall screws, and drywall. All you require to do is following very easy and simple steps to install drywall panels.

You need to make sure that you purchase the required panels before starting your renovation. Measure the ceiling and walls. Use the half-inch drywall panel for the walls and a thicker panel for the ceiling. There are large panels of drywall you can order when you have a wide ceiling. These panels are available in lengths of fifty-two feet and widths of nine feet. Nonetheless, the wider choice of the drywall panel the heavier it becomes. It is better to choose the required size based on the measurements.
Install your panels inside the ceiling first before installing them on the walls. Look for an assistant to help you in positioning them on the wall before nailing them. Maintain a six-inch distance between nails. They are secondary fasteners you only have. Screws of the drywall act as the primary fasteners. Choose medium-size screws and nails to prevent screws and nails from popping out. Otherwise, this will result in problems when you begin taping.
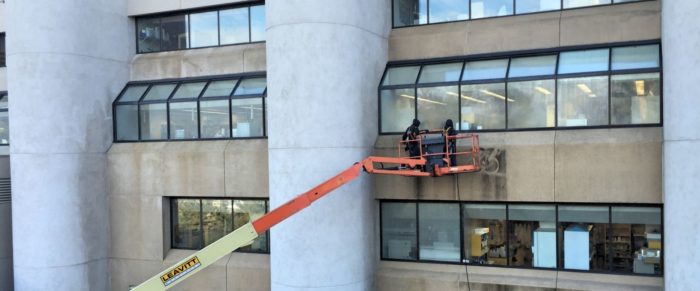
Utilize the lift from www.soflocontractor.com
Use a lift to install panels in your ceiling with the help of your assistant. It is better to install ceiling panels using a lift so that the panel is as tight to the ceiling as possible. After you finish installing the panels on the ceiling, start installing the panels to your walls and around doors and windows to achieve the looks you want.
After installing wall panels, make sure that they are pushed tightly against ceiling panels. They need to support ceiling panels. Remember that installing them on the wall requires specific holes to be cut like doors, windows, and electrical outlets.
For electrical outlets, doors, windows, and others that have to be cut measure them well and draw patterns on panels to indicate the location of the hole. Use the spiral cut-out saw, or keyhole saw to cut these patterns. Utilize the T-square to ensure that you are cutting straight and following the desired pattern. After cutting the holes, start positioning your walls in your walls. The good thumb rule is measuring twice and cutting once.
In case you have longer walls, you will have to use two or more drywall panels. Maintain distances of six inches from each nail. This will be helpful in the drywall sticking to the frame firmly. Do the screwing and nailing from the center outwards. After finishing the installation of the panels, prepare the materials and tools needed for taping. The process of taping involves hiding and polishing the joints of your drywall installation. You need to use the drywall applicator or flasher to distribute the mud solution evenly towards the flat surface and the corner after the process of installation.
Drywall applicators and drywall flushers are made from aluminum steel. The tools used in taping have to be bought before the process. You will utilize the mud solution to polish the edges, surfaces, and corners of your drywall. When dealing with the edges and corners, you need to utilize the drywall flusher while the applicator takes care of the curves. The drywall flushers are good for corners between the walls and ceiling. After mud application to the corners, the flusher can be utilized to save effort and time by making mud flush to your wall with minimal effort.
More Ceiling Space
The biggest issue with basements is low ceilings. The absence of height will make the basement renovation and drywall installation challenging. Many decorating tricks and tips will assist you to create additional space. It will also help if you limit the space amount that the ceiling would take. Drywall for the ceiling is the perfect solution. Unlike other materials of the ceiling, the basement drywall requires less space so that you do not give precious ceiling space.
Website Services Offered by South Florida Contracting Services
-
Aluminum Fences
-
Aluminum Roofs
-
Aluminum Screen Enclosure
-
Bath Tub Reglazing & Tub Resurfacing Contractors
-
Best Roofing Contractor in West Palm Beach
-
Carports & Awnings
-
Chain Link Fences
-
Commercial Custom Tile Installation
-
Commercial Fence Installation
-
Commercial Flat Roof Installation
-
Commercial Flooring
-
Commercial Painting
-
Commercial Popcorn Removal
-
Commercial Roofing
-
Commercial Screen Enclosures
-
Concrete Brick Pavers
-
Concrete Brick Pavers
-
Concrete Driveways
-
Concrete Driveways
-
Concrete Grinding
-
Concrete Overlayment
-
Concrete Polishing
-
Concrete Sidewalks
-
Concrete Underlayment Service Pros
-
Cork Floors
-
Corso Premium Screen Enclosure
-
Crown Moldings
-
Custom Concrete and Countertop Solution
-
Custom Tile Installation
-
Drywall Installation
-
Drywall Repair
-
EIFS Repairs
-
Engineered Floors
-
Epoxy Floor Finishing
-
Fence Repair & Replacement
-
Fire Damage
-
Flooring Repairs
-
Glass Rooms
-
Hardwood Floor Repair
-
Hardwood Floors
-
Install Pet Screens
-
Iron Fences
-
Kitchen & Bath Remodeling Service Solutions
-
Kitchen & Custom Bath Home Remodeling Pros
-
Knockdown Texture
-
Laminate Floors
-
Lanai Conversions
-
Lattices
-
Masonry
-
Masonry
-
Metal Roofing
-
Mold Removal
-
Orange Peel Ceilings
-
Outdoor Enclosures
-
Patio Covers
-
Patio Screen Enclosures
-
Pergolas
-
Phifer Screen
-
Pool Screen Enclosure Installation and Repairs
-
Pool Screen Enclosures
-
Popcorn Removal and Finish Removal
-
Privacy Walls
-
PVC Fences
-
Regular Roof Maintenance
-
Repair Screen Enclosure
-
Residential Custom Tile Installation
-
Residential Painting
-
Residential Popcorn Removal
-
Residential Roofing
-
Retaining Walls
-
Roll-Down Screen
-
Roof Lead Repairs
-
Roof Repairs
-
Shingle Roofs
-
Smooth Ceiling Finish
-
Solariums
-
Spa & Hot Tub Screen Enclosure
-
Stack CBS
-
Stucco and EIFS
-
Stucco Repair
-
Stucco/EIFS
-
Sunrooms
-
The Types of Tiles
-
Tile Installation & Contractor
-
Tile Maintenance
-
Tile Repair
-
Tile Roofs
-
Vinyl Fence
-
Water Damage
-
Water Heater Install and Replacement Services
-
Water Restoration
-
Wood Fences
Request for a free quote from our contracting service company now!